 To upload the files in your Web site, you will use Netscape or
Internet Explorer. Note that the form that we are
discussing here requires at least version 4 of either of these
browsers. There are two easy steps to this:
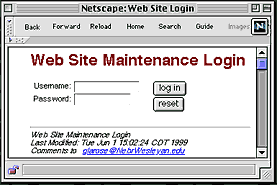
First, go to the Login Page for the uploader, shown to the
right. This prompts for a username and a password.
These will have been given to you by your friendly system
administrator. Enter them, and then press the "login" button. No,
really.
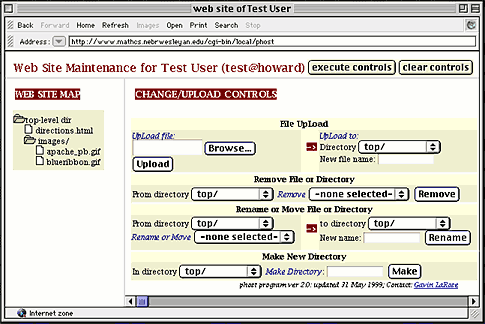
Once you've logged in, you'll see a screen something like that shown
below. Note the different parts of the screen.

- At the top of the screen, it tells us that we logged in as user "test"
on the server "howard." It also appears that "test"'s real name is
"Test User."
- At the left of the screen we see a map of "test"'s Web site.
The directory at the top ("top-level dir") is equivalent to the
Web site top level directory of the local site. Thus we
want to upload into the directories below "top-level dir" the
files that we have below the "website" directory on our home
directory where the local site is located.
- On the right of the screen there are four sections:
- File Upload: to upload a file from your local
site to the Web server.
- Remove File or Directory: to delete files or
directories from your site on the Web server.
Note: if you delete a directory,
all of the files (and directories!) under it will be
deleted as well. To delete a directory, use the
"From Directory" selector to pick the directory in which
it is a subdirectory, and then the "Remove" selector to
select the directory to remove.
- Rename File or Directory: to move a file or
directory from one place in your site to another.
- Make Directory: to create a new directory in your
site on the Web server.
- The execute controls button at the top
right of the page is the same as the buttons Upload,
Remove, Rename, and Make --
each executes all of the commands on the form,
not just one.
- Netscape may give you trouble if you try and resize the
browser window after loading the page. If this is the case, go
back and re-log in.
- Netscape also appears to have a bug in the way that it
displays the "file upload" form element, and puts a large amount
of extra space to the right of the element. This makes the
right part of the screen larger than it needs to be.
- You can resize the frames of the upload form.
Position the mouse over the border between the frames until it
gives a resize icon (this is harder to do with Netscape),
click and move.
Gavin's HHMI 02 Web Workshop: Web Form Uploading
Last Modified: Fri May 31 10:08:40 EDT 2002
Comments to
glarose@umich.edu
©2002 Gavin LaRose, UM Math
Dept
 To upload the files in your Web site, you will use Netscape or
Internet Explorer. Note that the form that we are
discussing here requires at least version 4 of either of these
browsers. There are two easy steps to this:
 To upload the files in your Web site, you will use Netscape or
Internet Explorer. Note that the form that we are
discussing here requires at least version 4 of either of these
browsers. There are two easy steps to this:
