 There are many different applications that "run"
a scanner, including Epson Scan, ColorIt, and even
Adobe Photoshop. While different, these all have
some similarities. The discussion that follows is probably most
relevant for standard flatbed scanners, but should apply also to other
types of scanners. In the Olin Lab we use either of Epson
Scan or ColorIt (or Photoshop).
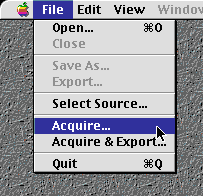
For each of these applications, we expect way of starting to scan:
this will be a command like Acquire, Scan or
Import, and is likely to be located on the
File menu of the application. (Figure to right.)
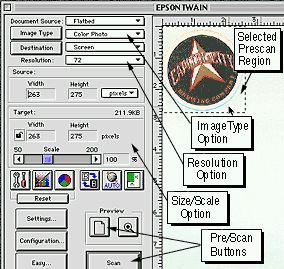
Once we have selected Acquire, we expect to see some sort of
control panel, as shown to the left-below. Important options on this panel
include the

- Image type being scanned, or Scanning Mode,
or Color Mode
- Resolution of the scanned image,
- Size, or Scale of the scanned image,
and various color and correction options. Also
present will be some sort of Preview or Prescan
action, and, of course, a Scan action (addressed below).
You should select an image type that reasonably approximates
the type of image that you are scanning. In particular, if you're
scanning a color image be sure that you have selected an image type
that involves color... =)
If you aren't going to do too much editing of the scanned image
in a program like Adobe Photoshop, the resolution of
the image should be set low, to reduce the size of the image file you
create -- a resolution of 72 dpi (dots, or pixels, per
inch) is good.
Note the size/scale of the image that you will generate by
scanning. Often scanning even a small picture will result in a very
large image (much larger than you would want to use on the Web). By
setting the size of the scanned image to be smaller, you can address
this problem as you start (and get a smaller image file, which is a
good thing). This will be evident after doing a prescan (as
noted below).
After setting the controls, do a prescan: this quickly generates an
approximate image, and lets you set a smaller region to do the actual
(much slower) scan on. The prescan will give you something like that
shown above. By clicking and dragging the mouse you should be able to
outline the region of the scanned image that you want, as is also
shown in the figure. This region is that which will actually
be scanned when we press the "scan" button.
Then scan the image by pressing the "scan" button.
To use the image, you will want to either
(1) Save it as an image file, manipulate it with
a program like Photoshop, and then use it on your Web page,
or (2) Save it as an image file and use it on
your Web page. We do not address (1) here.
The most common image formats for the Web are GIF and
JPEG: GIF files usually have an extension of ".gif", while
JPEG files have an extension ".jpg" or
".jpeg". For example, the scan control image above is
called scancontrols.gif. JPEG files are best for images
like photos with lots of graded colors, while GIF files are best for
other images. JPEG files are saved with a fixed colormap and built in
compression (the better the compression, the worse the final
resolution of the image), while in GIF files you can set the number of
colors in the colormap (and make parts of the image transparent) but
don't have compression to make the file smaller.
Once you've decided on a file type to use, save the image by selecting
File -> Save As (or File ->
Save) and save the file. The save menu will be likely to ask
you for a file type to save as, at which point you can specify a GIF
or JPEG file.
Gavin's HHMI 02 Web Workshop: Scanning Images
Last Modified: Fri May 31 10:21:55 EDT 2002
Comments to
glarose@umich.edu
©2002 Gavin LaRose, UM Math
Dept
 There are many different applications that "run"
a scanner, including Epson Scan, ColorIt, and even
Adobe Photoshop. While different, these all have
some similarities. The discussion that follows is probably most
relevant for standard flatbed scanners, but should apply also to other
types of scanners. In the Olin Lab we use either of Epson
Scan or ColorIt (or Photoshop).
