Editors: PageMill (Features 1) |
More PageMill
 |
|
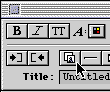
| Figure 5a: PageMill's place object button (above) | |
| Figure 5b: PageMill's transparency button (right) |
There are several ways to insert images (or other objects) into a PageMill document:
- Select File -> Place..., or use the Place Object button at the top left of the document window (figure 5a).
- Drag and drop an object from the Finder, pasteboard, or by copying and pasting from another application.
PageMill can also facilitate GIF transparency: open an image using File -> Open. Use the transparency tool (figure 5b) to click on the color in the image that is to be transparent. Then use File -> Save to save the image, which can then be imported into the document as above.
The Pasteboard
The Pasteboard is a useful little five-page scratch pad to
which HTML element(s) may be dragged---and then from which the
elements may be pulled to a new part in the document, or another
document. It may be started from the Window menu (figure 2 on the previous
page).
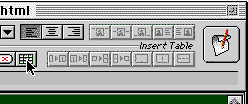 |
| Figure 6a: PageMill's table button |
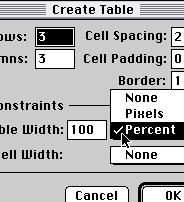 |
| Figure 6b: PageMill create table menu |
To create a table in PageMill, select the Table Button above the document that is being edited (figure 6a); this brings up the "create table menu" (figure 6b), which allows specification of the size of the table. Note: by default, PageMill may specify the Table Width and Cell Width to be some number of pixels. To create a table that sizes itself to the contents of each cell, select "None" for the Table and Cell Widths, as shown in figure 6b. To enter data in a table, click in the cell and enter text or HTML normally. Items may also be dragged into table cells (including other tables).
To add or delete rows or columns to a table, select the table cell by clicking in it and dragging the mouse to its border. Then click one of the "Add (Delete) Column" or "Add (Delete) Row" buttons---which are immediately to the right of the Table Button (figure 6a). Cells in the table may be joined with the "Join Cells" button (third from the right) after selecting more than one cell (click and drag the mouse across the cells to be selected). Similarly a large cell may be divided with one of the divide cell buttons (second and first from the right).
To format and align cells in a table, use the Inspector (figure 2): Select the cell(s) to be changed by clicking and dragging the mouse across them, then choose "Object" (4th tab) in the inspector. This allows one to set alignment of the text in the cell and other cell properties. To use the Inspector to set properties of the table, click in a cell and then on the fuzzy boundary to the table to select the entire table.
Finally, a table can be created by selecting cells of a Microsoft Excel spreadsheet, using Edit -> Copy to copy them to the clipboard, and then using Edit -> Paste to copy the clipboard into a PageMill document.
the Resources Folder
If multiple pages for a Web site are being created and maintained
using PageMill, some care may need to be taken to be sure that
the links that are created between pages and images are created
correctly. In the Edit -> Preferences menu Resources for
PageMill can be set. The Resources folder is that into which
PageMill may put files that it creats, and so should be set to
be the top directory in the Web site that is being created.
[editors] |
      [page mill] |
      [pm 2] |
      [pm 3] |
      [pm index]

      [pagespinner] |
      [ps 2] |
      [ps index]
[title] |
[objectives] |
[www uses] |
[the works] |
[basic html] |
[adv html] |
[editors] |
[resources] |
[feedback] |
last modified ((Wed Jun 25 20:46:59 CDT 1997))
HTML/WWW Wkshop: PageMill (features)
©1997 Gavin LaRose
Comments to:
glarose@NebrWesleyan.edu