HTML Editors: PageSpinner (Features 1) |
Text Styles:
 |
| Figure 4: Text format buttons in PageSpinner |
To create lists, the beginning/ending tags (e.g.,
<ul>, </ul>) may be entered by using the
"List" menu (to the right of "Text" at the top of the screen), and
list items (<li>) using the list button to the right of
the "B", "i", and center buttons.
 |
| Figure 5: PageSpinner Insert Image Button |
Tables:
To insert tables, the table button (the second button to the
right of the image insert button, figure 5) is eminently useful.
To format existing text into a table, (1) enter the text for each
table cell in a row separated by tabs, (2) enter each row on a
separate line, (3) select all text, and (4) click the table
button & apply the table with the desired attributes. Pretty darn
slick. Note that the "Insert sample table" option can be used to
insert a skeleton table into the HTML document, which can then be
edited.
Notebooks & Examples:
 |
| Figure 6: PageSpinner Window menu |
 |
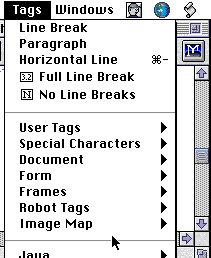
| Figure 7: PageSpinner Tag menu |
Imagemaps:
The Tag Menu (figure 7) also allows image-maps to be set
up. Under the "ImageMap" option, "Map Definition" sets the
<map name="name"> and </map> tags
for the client side image map;
"Linked Area..." sets the <area...> tags. The image to
be used as a map should be inserted using the image
button, and the name of the map used for the "Image Map URL" in
the corresponding HTML Assistant window.
Frames:
Frames in a document may be created using the Frames button (to
the right of the image button, figure 5).
To create both columns and rows of frames, use the Frames button
multiple times to nest the frames, first the rows and then the columns
(or vice versa).
[editors] |
      [pagemill] |
      [pm 2] |
      [pm 3] |
      [pm index]

      [pagespinner] |
      [ps 2] |
      [ps index]
[title] |
[objectives] |
[www uses] |
[the works] |
[basic html] |
[adv html] |
[editors] |
[resources] |
[feedback] |
Last modified: Thu Jul 17 15:45:43 CDT 1997
HTML/WWW Wkshop: HTML editors-PageSpinner
©1997 Gavin LaRose
Comments to:
glarose@NebrWesleyan.edu